Rack Deployment
This document describes the InstaGeni rack deployment process. If you are scheduled to receive a rack, and you have not already sent in the answers to the site survey, please see the checklist page. This information is required to bake the various disk images you will need. Send the survey info to geni-dev-utah@flux.utah.edu.
Getting Started:
If you are site administrator, you want to:
- Join the Emulab Admins group. This is a Google group with lots of other administrators and a searchable archive of very helpful info.
- Check out the Emulab Wiki, which contains a wealth of information on using Emulab.
- Arrange to archive or procmail a number of Emulab email lists someplace safe. The site admin starts out as the sole receiver of these email messages, but if you provide alternate addresses (say, exploders) we can send the email there instead. Just let us know.
Okay, once the images are baked by Utah, you can proceed with setting up your rack, but first a few pre-setup items:
- We assume that you have a rack, that you have taken the shrink wrap off, and that it is located in your machine room with power available.
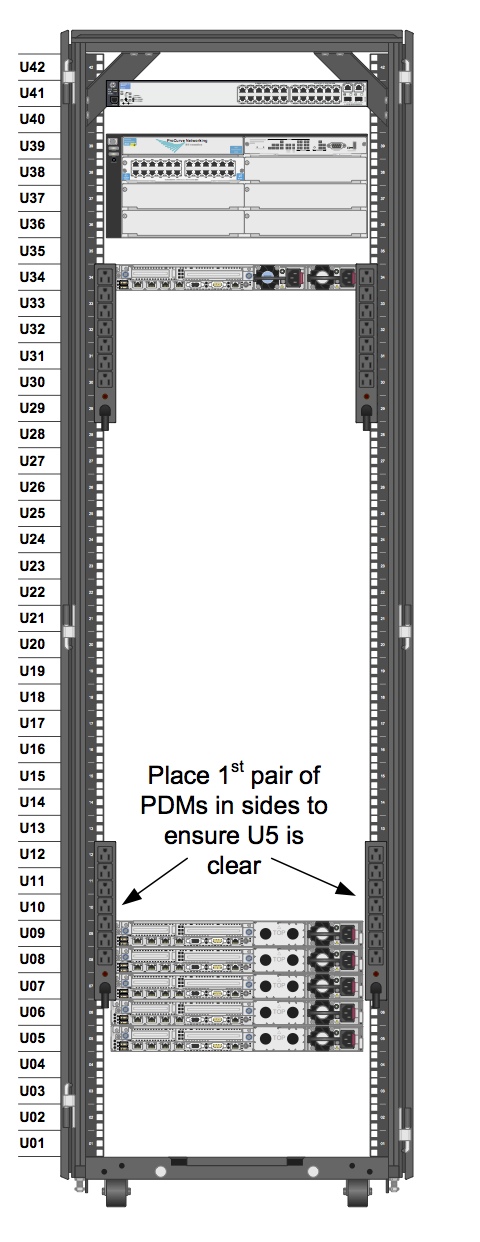
- Does the back of your rack look like this diagram? If not, stop now and contact us!
- Do you have an uplink to your campus/site network ready? It should be plugged into port 26 on the control switch (HP 2620) in slot U41. This port supports 1Gb and is preferred to a 100Mb connection.
- Is your rack wired up with ethernet cables? If not, you will need to wire the rack. Please see the rack wiring diagram.
- Is there a serial cable connecting the node in slot U34 to the HP 2620 in slot U41? It might be connected to the 5406 switch in slot U36. If so, reconnect it to the 2620.
- Is your data plane uplink (to the mesoscale network) ready? If so and you are using copper, please connect it to port 24 on the 5406 in slot U36 (do not attach it to the 2620). If you are connecting with fiber to mesoscale, please ask us what port to use.
Before proceeding, please unplug the power cords from the five PCs at the bottom of the rack; We do not want them to boot until we have the switches and the control node setup properly. Everything else in the rack can be plugged in normally and powered on. If you have already powered on the rack, go ahead and unplug the five PCs anyway; there is nothing on the disks that can be lost.
Attach a console to the control node and power on the node (or cycle power on it, if it is already plugged in). You will wait a while for the "HP ProLiant" screen. Wait until it says "press any key for Option ROM messages" and then right after the screen switches, type F8 to get into the iLo configuration. Gotta be fast on this. If you miss it, power cycle and try again. Once the iLo screen comes up, right arrow to Network and choose the DHCP option. You want to make sure DHCP is off. F10 to save and then ESC to go back. Then choose the NIC option. Fill in the iLo IP/Mask/Router, then F10 to save and then Esc to exit. iLo will reset (machine will reboot again). Ask Utah if you are not sure what IP to use for the iLo interface! More information on the iLo is here.
At this point, contact Utah to install the disk images on the control node. This might take a few days, and there are a few times that Utah may require some onsite assistance to power cycle switches/nodes, or move cables around. Near the end of the process, Utah will ask that you to plug in the five nodes that we asked you to unplug earlier.
Rack Infrastructure Notes:
As you can see from the rack diagram there are a number of physical devices in the rack. From the top down, they are:
- U41, Control Switch: This is how the rack connects to the external world and is called procurve1. Each node (U05-U09) has one interface connected to this switch.
- U36-U39, Data Switch: This switch connects all of the internal network interfaces and is called procurve2. Each node (U05-U09) has three interfaces connected to this switch.
- U34, Control Node: This is where the Emulab and Foam XEN VMs are hosted and is called xxx.control-nodes.instageni.net. The site administrator has accounts on the control node and each of the VMs, and may create more accounts as needed. There are four XEN VMs hosted on the control node:
- boss.your.domain: The Emulab control server.
- users.your.domain: The Emulab operations (file) server.
- foam.your.domain: FOAM
- flowvisor.your.domain: Flowvisor
- U05-U09, pc1-pc5: These are the five experimental nodes and are called pc1-pc5.your.domain.
The local administrator(s) can log into any of these resources, although some special instructions are needed to log into the switches and and experimental nodes. The first step is to log into boss.your.domain using ssh and the private part of the ssh key you provided when sending in the site survey. From there:
- procurve1: telnet to procurve1. The password is contained in /usr/testbed/etc/switch.pswd.
- procurve2: telnet to procurve2. The password is contained in /usr/testbed/etc/switch.pswd. The username is "manager".
- pc1-pc5: sudo ssh pcXXX
- pc1-pc5 iLo: sudo sshtb -mng -host pcXXX (Note that the iLo password for all nodes is stored in /usr/testbed/etc/ilo.pswd).
FOAM and FlowVisor
The rack comes with FOAM and FlowVisor VMs, which have a known-good FOAM and FV installed and configured, based on input from the sites. The site admins will then administer them (possibly with GPO help), and be responsible for upgrades to the software, typically in a coordinated fashion when advised by the InstaGENI team.
The VMs are initially created (and can be re-created, if they need to be rebuilt from scratch) by a script which an admin (either an InstaGENI admin or a site admin) runs on the control node. After initial installation, their software will be upgraded when the GENI-preferred version of FOAM and FV changes, just like any other FOAM/FV site.
The script (and the images it creates) may also get updated when the GENI-preferred version of FOAM and FV changes. For more information about Foam and FlowVisor, please see: