Gec9Tutorial
GEC 9 Tutorial
Slides
The slides from the tutorial are attached below.
Emulab Frontend to ProtoGENI (aka 'Cooked Mode')
This section describes an optional 'homework assignment' for the GEC 9 tutorial
Log in to http://www.emulab.net, and navigate to the 'Begin Experiment' page. It can be found from the 'Experimentation' menu, or this direct link.
Fill out the form.
- Make sure the 'Project' drop-down box has the 'gec9tutorial' option selected.
- Pick an experiment name no one else is likely to use.
- For the 'Your NS File' section - download this file, and upload it in the 'Upload' box.
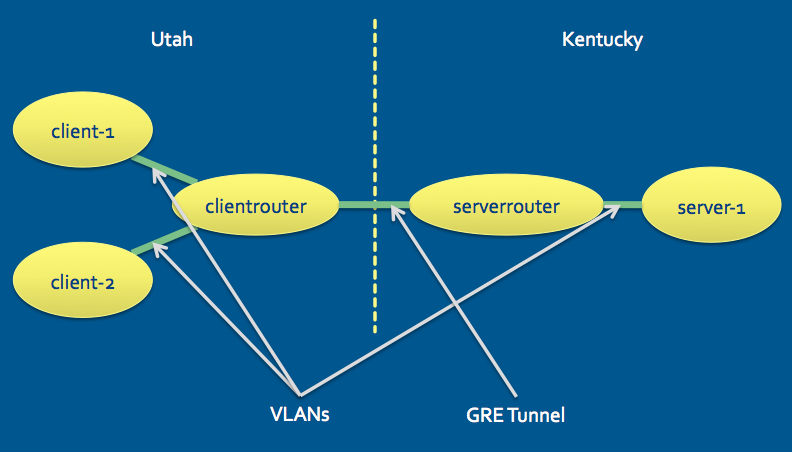
We suggest opening the NS file with a text editor and taking a look at it - it does a number of interesting things, and is well commented. The topology created by this NS file looks like this:
This NS file uses nodes at Utah and Kentucky, and constructs a tunnel between them. It loads operating system images on some of the nodes, starts a webserver, sets up automatic traffic generation, and more. It makes use of the loops and conditionals in NS to create a parametrized topology - for example, you can adjust the number of clients and servers up at the top (but please don't turn the number up too far!)
Click 'Submit'! You'll now see a logfile of all of the actions that are being taken to create your experiment and slice. When the creation is done (it will take a few minutes), the log will report success, you'll get email, and (depending on your browser) you may get a pop-up letting you know it's done.
You can click on the name of the experiment at any time during the process to go to the 'experiment page'. From there, you can explore more aspects of your experiment, such as:
- A visualization of the topology
- The identities of the nodes allocated to you
- Information about the slices that were created for you
- ... and much more
The hostname for each node that you were assigned depends on which site each node is at: the 'utahemulab' nodes have hostnames like 'pcXXX.emulab.net', and the 'ukgeni' nodes have hostnames like 'pcXX.uky.emulab.net'. You can also look up a node's hostname by clicking on its 'Node ID' link.
The sample NS file starts up a webserver on each node, which serves a simple "speed test" application (in Flash). You can visit the host in your browser to see this application, and verify that it was set up properly.
If you want to log in to any of the nodes in your experiment, you will need to have your ssh keys set up; nodes set up in this way do not accept logins with passwords. Log in using your Emulab username.
When you are finished with the experiment, use the 'Swap Experiment Out' link on the experiment page.

